Introduction
Imagine waking up on a chilly winter morning and feeling warm and snug even before you switch on your heater. Or, picture a scorching summer afternoon, but inside your home, it’s comfortably cool. This is not just wishful thinking; it’s possible with the right home insulation.
- Introduction
- Understanding DIY Injection Foam Insulation
- The Benefits of DIY Injection Foam Insulation
- Is It Worth the Cost?
- The DIY Injection Foam Insulation Process
- Knowing the Limits: When to Seek Professional Help
- Finding Reliable Insulation Contractors in Your Area
- Conclusion
- Can Foam Insulation Be Injected Into Existing Walls? - Youtube Video
- FAQs(Frequently Asked Questions)
Home insulation plays a pivotal role in maintaining comfortable indoor temperatures and reducing energy consumption. Among the various insulation methods available, DIY injection foam insulation stands out as a potentially cost-effective alternative to professional techniques.
This article dives deep into this energy solution, exploring its benefits, cost-effectiveness, and installation process. You will learn:
- What DIY injection foam insulation entails
- Its advantages over other types of insulation methods
- How it compares cost-wise with professional installations
- The step-by-step process of installing DIY injection foam insulation
- When it might be time to seek help from a professional
So let’s get started!
Understanding DIY Injection Foam Insulation
DIY Injection foam insulation is a popular choice among homeowners looking to enhance the energy efficiency of their homes. Unlike traditional insulation types, it’s designed to be user-friendly and can be installed without the need for professional assistance, offering a significant cost-saving advantage.
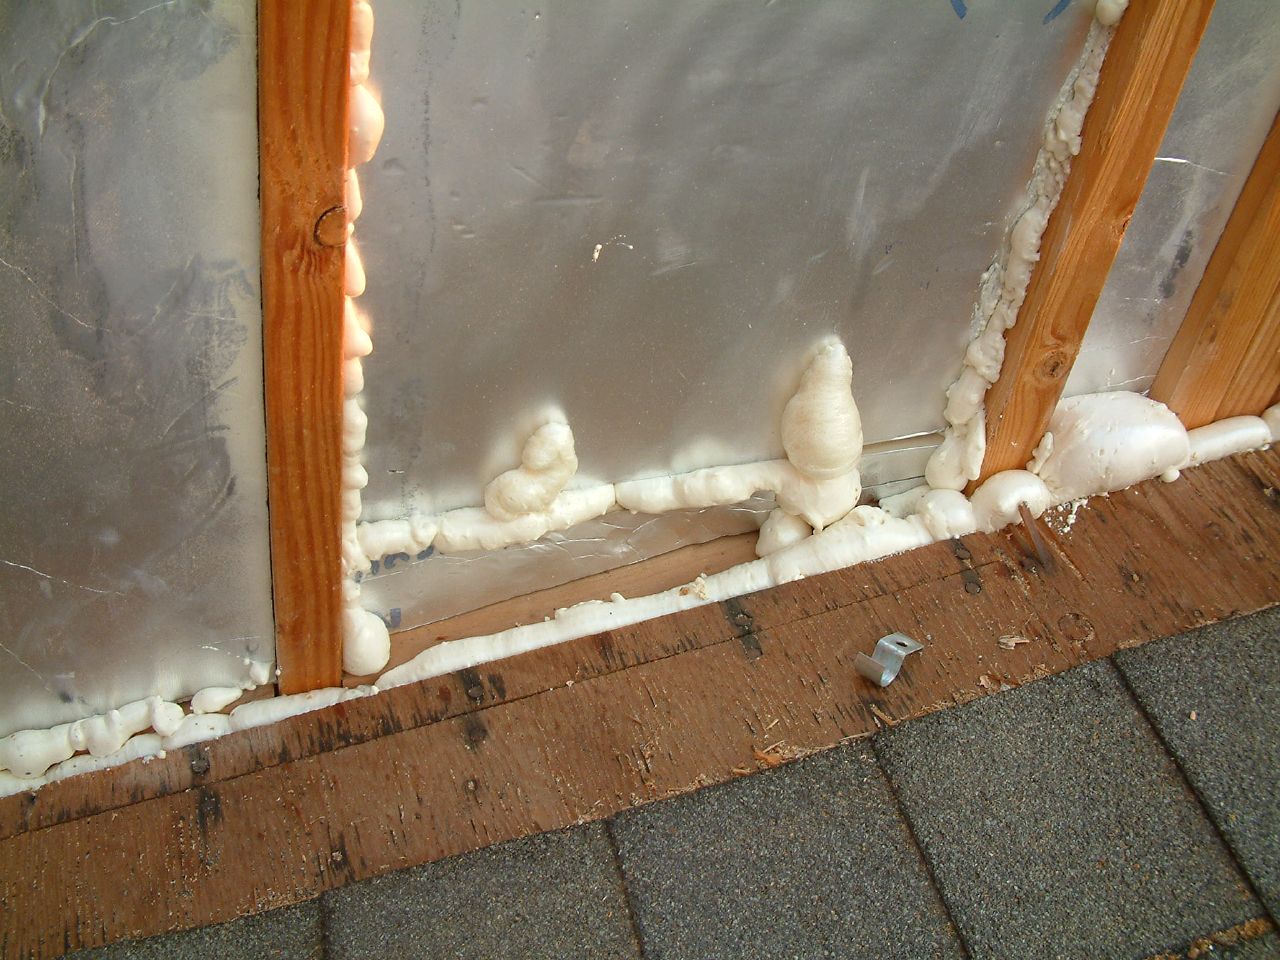
The key difference between DIY injection foam insulation and other forms like spray foam insulation lies in the application process. While spray foam expands and solidifies upon contact with air, injection foam is designed to expand within wall cavities or other enclosed spaces, providing a thorough and even layer of insulation.
Here’s a brief overview of how it works:
- The foam is injected into the wall cavities through small holes drilled in the wall.
- It expands within the cavity, filling all gaps and crevices.
- Once dried, it forms a continuous thermal barrier that reduces heat transfer.
There are different types of foam insulation available in the market, but not all are suitable for DIY projects. Open-cell and closed-cell foams are typically used by professionals due to their complex installation process. For DIY projects, low-pressure polyurethane spray foam kits are much more manageable. These kits include everything you need – from hoses and nozzles to the foam itself – making them an ideal option for homeowners aiming to tackle insulation improvement on their own.
This section has laid out what DIY injection foam insulation entails and how it contrasts with other types. Let’s delve deeper into its advantages next.

The Benefits of DIY Injection Foam Insulation
DIY injection foam insulation is a game-changer for homeowners looking to cut down on energy bills and increase the comfort level of their living spaces. Here’s how:
1. Reduced Energy Bills
By filling in the gaps within walls, DIY injection foam insulation prevents air leakage, leading to significant energy savings. The enhanced thermal efficiency means heating and cooling systems don’t have to work overtime to maintain desired temperatures, reflecting positively on monthly energy bills.
2. Comfortable Temperatures Year-Round
This form of insulation ensures an airtight seal, eliminating drafts that can cause cold spots in winter or heat influx during summer. Consistent indoor temperatures make every room in your home more enjoyable.
3. Protection Against Extreme Weather
Homes insulated with injection foam can better withstand the wrath of nature. The solid barrier formed by the foam can help mitigate damage from hurricanes or keep interiors from freezing during severe cold snaps.
4. Reliability During Power Outages
In the event of a power outage, a well-insulated home can maintain its temperature for a longer period without active heating or cooling. This added layer of insulation keeps your space livable and offers peace of mind knowing your home won’t immediately succumb to external temperature changes.
By addressing these key areas, DIY injection foam insulation stands out as a robust solution for homeowners who prioritize energy efficiency, comfort, and resilience against the elements.
Is It Worth the Cost?
When deciding whether to do your injection foam insulation project, one important factor to consider is whether it’s worth the cost. In other words, will the money you save on energy bills in the long run outweigh the upfront expenses? Here are some things to think about:
Upfront Costs
First, let’s look at how much it will cost you to get started with a DIY spray foam insulation project. The price of a kit that includes everything you need for the job can range from $600 to $750. These kits typically cover an area of about 600 square feet at a thickness of 1 inch.
At first glance, this might seem like a lot of money. But it’s important to keep in mind the potential savings down the road.
Potential Savings
Making improvements to your home’s insulation can lead to significant reductions in your heating and cooling costs. According to the U.S. Department of Energy, sealing air leaks and adding insulation can lower your energy bills by up to 20% for heating and cooling or up to 10% for your total annual energy bill.
Over time, these savings can really add up.
Comparing Costs
Now, let’s compare the cost of doing it yourself with the cost of hiring a professional.
- The average cost for professional spray foam insulation can range from $1,463 to $2,926 depending on factors like the size of your home.
- As you can see, this is significantly more than the cost of a DIY kit.
Considerations Beyond Cost
However, it’s important not to make your decision based solely on cost. There are other factors to consider as well:
- Quality: While doing it yourself gives you control over where and how much foam you apply, it may not reach certain areas as effectively as professional equipment would.
- Complexity: Professionals have experience working with all types of homes, including those with tricky areas that might be challenging for an amateur to handle.
Making Your Decision
In the end, the choice between doing it yourself or hiring a professional for your insulation installation is a personal one. Here are some things to keep in mind as you make your decision:
- Your comfort level with DIY projects
- The complexity of your home’s structure
- Your budget
By considering all these factors, you’ll be able to make an informed decision that’s right for you.
The DIY Injection Foam Insulation Process
DIY spray foam kits have become popular for small-scale insulation projects due to their ease of use and affordability. They are compact and most kits come with everything you need to start insulating. For Michigan homeowners, these kits have proven to be a cost-effective solution for tackling drafty spots around windows, doors, and other areas that traditional insulation might miss.
Icynene, a leading brand in the industry, offers DIY injection foam insulation that significantly improves a home’s energy efficiency. It expands upon application, filling every nook and cranny to create a thermal barrier that keeps warm air in during winter and cool air in during summer. This feature is particularly beneficial for homes in Michigan where weather conditions can vary dramatically between seasons.
Assess Specific Needs
When considering the appropriate kit for your project, it’s important to assess your specific needs:
- How large is the area you’re planning to insulate? Larger areas may require more than one kit.
- What are the local climate conditions? Different products have varying R-values (a measure of insulation’s ability to resist heat flow), so choose one that meets your local weather needs.
- What is your budget? While Icynene may be a top-tier product, there are other reliable brands available at different price points.
Once you’ve selected the right DIY injection foam kit, follow these steps for successful installation:
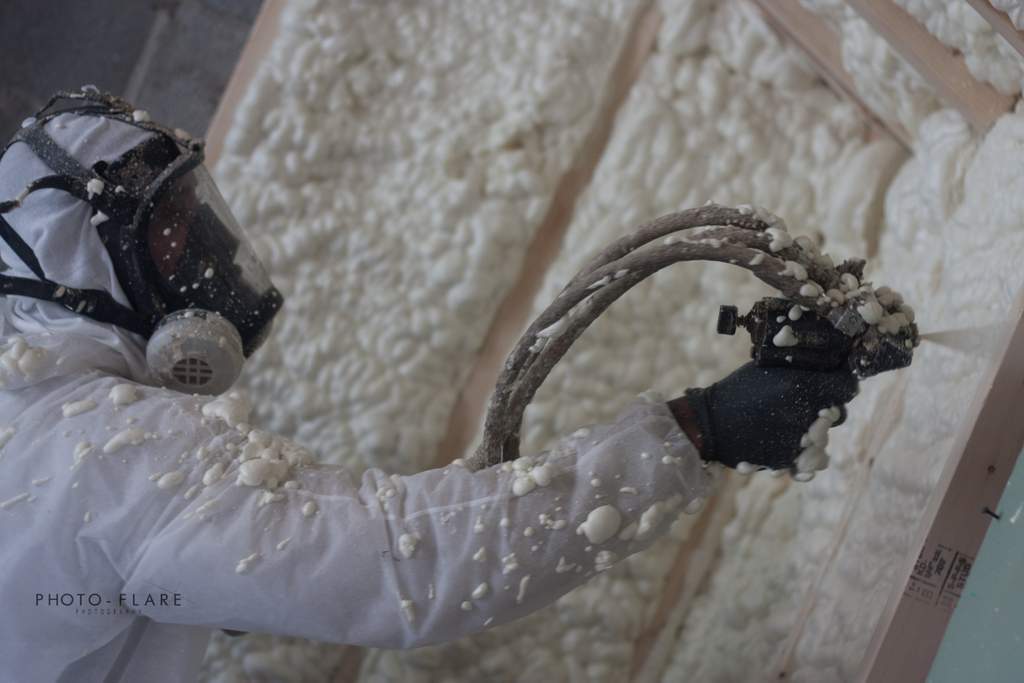
- Protect yourself: Always wear protective clothing, gloves, and eye protection when handling spray foam insulation.
- Prepare the area: Clear any debris from the area to be insulated and cover nearby objects with plastic sheeting to protect them from overspray.
- Mix components: Most DIY kits will contain two components that need to be mixed together before application.
- Apply insulation: Following the instructions on your kit, begin applying the foam insulation into wall cavities or other target areas.
- Allow for expansion: Remember, the foam will expand once applied. Be sure not to overfill your target area.
- Cleanup: Once you’ve completed the application, clean up any excess material immediately while it’s still wet.
Safety is paramount during DIY insulation projects, as improper handling can lead to skin and eye irritation or respiratory issues. Always work in a well-ventilated space and consider using a respirator if you’re working in a confined area.
While DIY injection foam insulation can be a game-changer for many homeowners, it’s crucial to understand the process thoroughly before diving into a project. This understanding will ensure optimal results and contribute towards making your home more energy-efficient and comfortable.
Knowing the Limits: When to Seek Professional Help
Deciding to insulate your home is a crucial step towards energy efficiency and comfort. While DIY methods like injection foam insulation can be cost-effective, they may not always be suitable for every scenario.
Complex Structural Issues
Structural complexities such as irregular or non-standard wall cavities, multiple layers of existing insulation, or deteriorating building materials can make DIY insulation projects challenging. Problems might arise when dealing with:
- Old or deteriorated building materials
- Irregularly shaped or non-standard wall cavities
- Multiple layers of existing insulation
In these situations, a professional insulation contractor has the expertise to navigate these complexities and ensure that your insulation is installed correctly.
Compliance with Building Codes
Insulation work doesn’t just involve injecting foam into walls. It’s also about adhering to building codes which are designed to ensure structural safety and energy efficiency. These regulations may dictate:
- The type and amount of insulation required
- How and where it should be installed
- Safety considerations during installation
It’s essential to consult local regulations and energy efficiency guidelines before undertaking any DIY insulation work. Non-compliance can result in fines or even necessitate costly rework.
Energy Efficiency Guidelines
Energy efficiency guidelines provide standards for achieving optimal thermal performance in buildings. They include recommendations on:
- Appropriate R-values for different climates
- Best practices for installation
- Ways to prevent common insulation issues like thermal bridging or air leaks
A professional contractor not only understands these guidelines but can also help you implement them effectively to maximize the benefits of your insulation project.
Remember, DIY projects are empowering, but knowing when to bring in professionals is equally important.
Finding Reliable Insulation Contractors in Your Area
When the scope of your home insulation project goes beyond the DIY realm, finding the best insulation contractor becomes essential. It’s not just about filling in gaps; it’s about ensuring long-term energy efficiency and safety. Here are some practical tips and key factors to help you identify a trustworthy professional:
Research and Vetting Contractors
- Check Licenses: Ensure that potential contractors have the necessary state and local licenses. This is a basic requirement that any reputable contractor should meet.
- Insurance Coverage: Verify that they have both liability insurance and workers’ compensation. This protects you from being liable for any accidents or damages that occur during the job.
- References and Reviews: Look up customer feedback online or ask for references. Current and past clients’ experiences can provide valuable insights into the contractor’s work quality and reliability.
Evaluating Contractor Estimates
- Experience Level: Assess the contractor’s experience with injection foam insulation specifically, not just general insulation tasks.
- Reputation in the Industry: A good reputation is often built over the years through consistent work quality and customer satisfaction. Check industry affiliations and awards.
- Detailed Estimates: Expect a comprehensive estimate that addresses your home’s specific needs. The estimate should break down costs for materials, labor, and any additional services.
- Timeline: A professional should be able to provide a clear timeline for project completion. Delays can be costly, so an efficient schedule matters.
Selecting the right contractor will ensure that your home is insulated properly with minimal fuss. With these points in mind, you can confidently approach contractors, knowing what to look for to secure a successful project outcome.
Conclusion
DIY injection foam insulation is a practical, viable, and cost-effective solution for home improvement projects. It champions both energy conservation and enhanced comfort within your living space.
Here are some key takeaways to consider:
- Direct involvement: DIY insulation offers homeowners the opportunity to directly participate in improving their homes. While it’s not always a perfect fit for every scenario, understanding the process and possibilities can empower you to make informed choices about your insulation needs.
- Energy savings: The insulation’s role in energy conservation is unrivaled. By improving thermal efficiency, it reduces dependency on HVAC systems, leading to significant savings on energy bills.
- Increased comfort: Comfort is another selling point of DIY injection foam insulation. By eliminating drafts and ensuring a consistent indoor temperature, it makes your house feel more like home.
Looking ahead, consider DIY injection foam insulation as an investment into an energy-efficient future. Its value extends beyond immediate cost savings and ventures into long-term sustainability and comfort. As you weigh the options and evaluate potential contractors for those tasks beyond the DIY scope, remember that every step taken towards better insulation is a stride towards a greener, more comfortable home.
Can Foam Insulation Be Injected Into Existing Walls? – Youtube Video
FAQs(Frequently Asked Questions)
What are the benefits of DIY injection foam insulation?
DIY injection foam insulation offers reduced energy bills, comfortable temperatures year-round, protection against extreme weather, and reliability during power outages.
Is DIY injection foam insulation worth the cost?
When considering the cost of DIY injection foam insulation, it’s important to weigh the upfront costs against the potential savings and also consider other factors beyond cost before making a decision.
What is the DIY injection foam insulation process?
The DIY injection foam insulation process involves using spray foam kits to fill in gaps within walls and ensure an airtight seal, providing efficient insulation for your home.
When should I seek professional help for DIY injection foam insulation?
If your home has complex structural issues or if you need to ensure compliance with building codes and energy efficiency guidelines, it may be necessary to seek professional help for DIY injection foam insulation.
How can I find reliable insulation contractors in my area?
To find reliable insulation contractors in your area, it’s important to research and vet potential contractors by checking their licenses, evaluating their experience level, and comparing their estimates.
What is the conclusion about DIY injection foam insulation?
In conclusion, DIY injection foam insulation is a practical, viable, and cost-effective solution for homeowners looking to improve energy efficiency and comfort in their homes.
Citation
- Insulation and Air-Sealing for Enclosed Cavities (Injection Foam) Technology. 2022. Accessed January 5, 2024.
- New Zealand. Department of Building and Housing. 2010. The Issuing of a Notice to Fix in Respect of the Injection of Foam Insulation Into the Cavity Behind a Brick Cladding to an Existing House at 88 Forfar Street, Dunedin. Accessed January 5, 2024.
- Cold Regions Research and Engineering Lab Hanover N H. 1976. Thermal Insulation by Injection of Urea Foam in Building Structures (Varmeisolering Genom Injektering Av Karbamidskum i Byggnadskonstrucktioner). Accessed January 5, 2024.
- National Swedish Board of Urban Planning and Cold Regions Research and Engineering Laboratory (U.S.). 1976. Thermal Insulation by Injection of Urea Foam in Building Structures.
- Foam University by RetroFoam. 2023. ‘Is it Possible to Install Injection Foam Insulation DIY? | Foam University by RetroFoam.’ YouTube video, 12:00. https://www.youtube.com/watch?v=gMv-5D520Cs. Accessed January 5, 2024.
- Out of the Woods. 2022. ‘DIY Spray Foam That Anyone Can Do And Afford. I Saved Thousands $$$.’ YouTube video, 22:19:12. https://www.youtube.com/watch?v=gspLOae6REU. Accessed January 5, 2024.
- Inside Lighthouse. 2021. ‘DIY vs. Professional Spray Foam Insulation – Is It Worth It?’ YouTube video, 20:59. https://www.youtube.com/watch?v=lBtiUCO7bFw. Accessed January 5, 2024.
Perla Irish, who is more familiarly known as Irish, is the Content Manager at newfld.com. She loves following trends around home and garden, interior design and digital marketing. Through this blog, Irish wants to share information and help readers solve the problems they are experiencing.